Designer, kNotes for kNitters
Creator, Happy Hands Hand Cream for Knitters
Grower, Maggie’s Microgreens
Sandia Park, New Mexico
Oooh, I’m so excited to have found this wonderful mid-century sugar bowl for my microgreens!
I love the fat round “coupe” shape of the bowl, the lacy ring-shaped handles and lid finial, and most of all, the beautiful dove gray color!
This piece is from the “Ballerina” pattern, union made in Cambridge, Ohio by Universal Potteries, designed by Alf Robson.
Universal Potteries introduced the Ballerina pattern in 1948, in four colors: Periwinkle Blue, Jonquil Yellow, Jade Green, and this Dove Grey.
At left is a Ballerina advertising brochure showing one of the 4 new colors introduced in 1949 – Burgundy – along with Forest Green, Chartreuse and Sierra Rust.
Then in 1955 the last 4 color sets were released, in Pink, Charcoal (which looks black), Turquoise Blue and Antique White.
In addition to the solid color pieces like mine, Ballerina pieces were also made with decorative decals. (Personally, I prefer the solid colors.)
The size & shape of this sugar bowl make it the perfect mini-garden planter: the bowl interior is about 4-1/2 inches wide and 2-3/4 inches tall. It's ideal for growing a larger crop of microgreens than a teacup, but it’s still counter top scale.
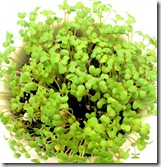
Here’s how it looks planted with organic arugula microgreens … sweet!
So far I’ve only found one of these – and I was especially lucky to find this one WITH its original lid, AND in pristine condition. Woot!
I’ve already made up the microgreens kit in my Etsy shop, and I also offer the organic arugula seeds separately. For the time being at least this planter kit is one of a kind … but I’ll keep looking …
--MaggieBelize
Designer, kNotes for kNitters
Creator, Happy Hands Hand Cream for Knitters
Grower, Maggie’s Microgreens
Sandia Park, New Mexico
My Happy Hands hand cream was featured in Germany’s leading knitting magazine, The Knitter!
Big time thanks for this feature to our German wholesale partner, the Knitty Bitty shop in Erfurt, Germany.
Knitty Bitty currently carries 7 of my 32 Happy Hands hand cream fragrances: Cucumber Melon, Grapefruit Twist, Mango Orange, Sandia Sage & Lavender, Tall Cotton, White Tea & Ginger, and Unscented.
According to Angela Mühlpfordt, Knitty Bitty’s owner, the best-selling scent in Germany is Tall Cotton, a light, clean scent also popular here in the States - one of my top three all-time bestsellers, along with Sandia Sage & Lavender and Hippie Chick (a kinder, gentler patchouli).
Since the steep increase in USPS international package shipping rates this January, it’s nice to know my European customers now have a local buying option.
Customers can purchase my Happy Hands hand cream from the Knitty Bitty shop in Erfurt, or order online through Knitty Bitty’s website at http://www.knittybitty.de .
--MaggieBelize
Designer, kNotes for kNitters
Creator, Happy Hands Hand Cream for Knitters
Grower, Maggie’s Microgreens
Sandia Park, New Mexico
While most cooks use microgreens only in cold dishes like salads and smoothies, I like to find ways to incorporate their tasty goodness into hot dishes as well … especially soup.
This can be a challenge, as heat rapidly wilts the delicate greens. My secret technique to keep microgreens bright and crisp atop a steaming bowl of soup, all the way to the table? Float the freshly-snipped greens on a protective – and delicious! – layer of grated cheese, or a dollop of cool plain yogurt, just before serving.
While you can use this layering strategy for any hot soup, with any microgreens you like, I am particularly fond of peppery Oriental mustard microgreens atop hearty, homemade tomato soup.
This past week has been wintry, so I found myself craving the warmth and comfort of tomato soup.
I started with a new-to-me recipe from Onceamonthmom.com, and tweaked it to our family taste for hot stuff – adding roasted New Mexico green chilies to the mix, and topping it with sharp Cheddar cheese and the aforementioned Oriental mustard microgreens.
Here’s what I made:
Ingredients
2 cans (14.5-oz ea) fire-roasted diced tomatoes
1 cup coconut milk, canned or carton
1 tablespoon coconut oil
1 cup diced onion
1/4 cup peeled & diced roasted green chilies
1 pound ground beef
3 cloves garlic, minced
1 teaspoon salt
1 cup homemade chicken broth
Garnish: Grated cheese and freshly snipped microgreens
Directions
In a blender or food processor, combine diced tomatoes and coconut. Blend until smooth. Reserve.
Heat coconut oil in a large stockpot. Sauté onions and green chilies together until the onions are soft and translucent.
Add ground beef, garlic and salt. Cook, stirring to break up large chunks, until beef is browned and crumbly. Drain off excess fat.
Return stock pot with drained beef mixture to heat. Stir in blended tomato/coconut mixture and chicken broth. Bring to a boil, then reduce heat and simmer for 15 minutes.
Ladle soup into 4 serving bowls. Top each with grated cheese of choice (I like sharp cheddar), then sprinkle freshly snipped microgreens over the cheese. Serve immediately!
Note: You can substitute a tablespoon of plain yogurt (low-fat or full-fat) per bowl for the grated cheese. The yogurt should be at cool room temperature before garnishing your soup.
~~~~~~~~~~~~~~~~~~~~~~~~~~~~~~~~~~~~~~~~~~~~~~
I like Christine’s technique of blending the tomatoes and the coconut milk before adding to the soup! And when winter forces you to fall back on commercially canned tomatoes, choosing “fire roasted” tomatoes really adds color and texture to your soup.
I should note that the original recipe works beautifully for a Paleo diet. Just leave out my grated cheese if you’re Paleo-ing – what the heck, so your microgreens wilt a bit, right?
Enjoy!
--MaggieBelize
Designer, kNotes for kNitters
Creator, Happy Hands Hand Cream for Knitters
Grower, Maggie’s Microgreens
Sandia Park, New Mexico
Oh the weather outside is frightful
But the fire is so delightful
And since we've no place to go
Let it snow, let it snow, let it snow!
Stay warm, y’all!
--MaggieBelize
Designer, kNotes for kNitters
Creator, Happy Hands Hand Cream for Knitters
Sandia Park, NM
The night before I flew to Austin I took a long, hard look at my favorite suitcase. It’s a “million-miler” bag that’s traveled all over the world, still sturdy with maybe another million miles left in its useful life.
But it’s solid black.
Seriously, how many solid black suitcases have you seen on the baggage belt? Hundreds? Thousands? The only problem with this bag is how hard it is to identify it at luggage claim.
I’ve tried tying various flashy objects to this suitcase on previous trips. Christmas tinsel, worry dolls, fuzzy yarn – you name it. But every time my embellishments have been torn off in transit, or looked ridiculous. I wanted a more permanent solution to the basic black bag.
So, the night before I flew to Austin, I decided to decoupage my suitcase. And thanks to the bone-dry climate of our high mountain desert, it was done and ready to pack an hour later.
While I would have liked to go completely crazy with this decoupage project, with maybe Frida Kahlo and dancing skeletons, I only had an hour to work on this – AND my husband also uses the suitcase, so understatement was the order of the day.
Here are the finished pix, taken AFTER I flew to Austin and back again. I was thrilled to see how well the decoupage survived the armies of baggage handlers!
How I Did It in Under an Hour:
And done! At the airport I recognized my bag immediately! And as I said, the decoupaged paper held up remarkably well to its first round trip.
I can’t wait to do another …
--MaggieBelize
Designer, kNotes for kNitters
Creator, Happy Hands Hand Cream for Knitters
Sandia Park, NM
Today’s rain showers missed us by inches, but we did get a double rainbow out of the deal.
If you look closely, you can see the second rainbow – very faint – in the upper left of the picture:
Should I tell the neighbors, or just sneak over to dig up the pot o' gold from their yard?
--MaggieBelize
Designer, kNotes for kNitters
Creator, Happy Hands Hand Cream for Knitters
Sandia Park, NM
We had an energetic thunderstorm this afternoon (August 19). When I walked out on my back porch to admire it, here’s what I saw:
I’d guess it was about half a mile to the north-north-west of us.
And then it got closer:
Mind you, here in Sandia Park (NM) we’re at almost 7,000 feet elevation. I didn’t think we got tornadoes … so what the heck is it?
A neighbor who is meteorologically sophisticated told me it was a downspout. According to the National Weather service, it was a funnel cloud. By definition, a funnel cloud isn’t a tornado unless it touches down and wreaks some havoc on the surface. I watched this one for 20 minutes or so and never saw it touch down.
This phenomenon was unusual enough to make our local news:
I didn’t realize that "tornadoes can and do occur at high elevations" - this summer, one was spotted at almost 12,000' in Colorado.
But they are rare - either because so few people live above 5,000' that the tornadoes that do occur aren’t seen and reported, or (according to MSNBC), because mountains like ours break up the large-scale weather systems that give rise most tornadoes ...
What a long, strange summer this has been!
--MaggieBelize
Designer, kNotes for kNitters
Creator, Happy Hands Hand Cream for Knitters
Sandia Park, NM
Great use for a single skein of sock yarn!
This free knitting pattern by Betty Balcomb is easy, and forgiving - considering my boo-boo of accidentally starting with US 11s instead of 9s, for instance.
I truly love this yarn - Stricken Smitten’s Shimmer Glimmer – a 50/50 silk and merino blend. Lovely match for the pattern.
I bought the yarn at Sock Summit 2011 in Portland, and cast on while flying home (that’s when I made my needle size error) … and then the project lingered forever in my UFO basket.
Fast forward to New Year’s Eve 2012, when I resolved that this year I would make myself finish one UFO for every new project I cast on.
All that I needed to do on this one was weave in the ends & block it (and take its pictures), now it is all done!
--MaggieBelize
Designer, kNotes for kNitters
Creator, Happy Hands Hand Cream for Knitters
Sandia Park, NM
Yes, we’ve listed our East Mountain “ranchito” for sale. And I know this will be somebody’s dream home, just like it was ours!
This is a custom 3 or 4 bedroom (2 masters, one up, one down), 3 bath, 2,520 sq ft Pueblo-style home on a 5-acre horse property … passive solar … part fenced pasture, part wooded with pinon and cedar.
We added 700 square feet to the existing home, including a ground level guest suite (or second master bedroom) …
and a home office/4thBR with floor-to-ceiling bookcases & captain's bed … Sliding French doors open to the back patio and deck.
The home is heated with in-floor radiant heat and a massive kiva fireplace with heat returns.
Thanks to the kiva, the open floor plan, and the passive solar orientation, our propane guy told us we had the lowest propane usage in the whole neighborhood.
We installed Saltillo tile throughout the downstairs, which looks great with the tongue & groove ceilings and Southwestern wood detailing.
Kitchen has granite counters and a fabulous 29-cubic-foot French door Samsung refrigerator that I’m crying to leave behind …
The garage is an oversized 2-car with custom storage cabinetry & a workshop.
The outbuildings (2 barns and 2 coops) have electricity, and there are 4 freeze-resistant pumps for irrigation (reduces your fire insurance, too). And the entire perimeter is “Invisible Fenced” for dogs.
Beautiful views of the Sandia Mountains and the Sedillo valley …
We’re asking $349,900 for our dream ranchito … you can see the Keller Williams listing with more pictures here http://bit.ly/McXiBH …. and take a virtual tour here http://www.pfretour.com/7921 !
--MaggieBelize
Designer, kNotes for kNitters
Creator, Happy Hands Hand Cream for Knitters
Sandia Park, NM
A teenage friend & I devoted a couple of days to tie dye, what fun! We experimented with color dyeing, discharge (bleach) dyeing, painting, stamping and stenciling.
Here are my four of our finished shirts:
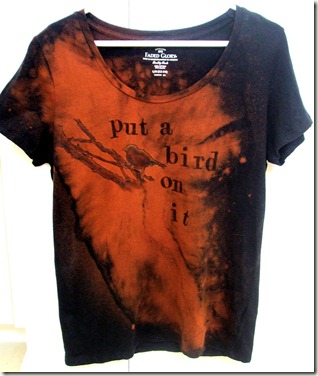
This tribute to Portlandia was discharge dyed, then fabric painted and rubber stamped.
Draped the shirt front with wet cheesecloth for resist, then sprayed with 1:2 bleach:water mix. Allowed to bleach for 10 minutes. Rinsed in cold water, then soaked in 1:4 vinegar:water mix to stop the bleach action.
Washed and dried the shirt, then sketched bird silhouette and branches, outlined with fabric paint markers, then filled in with brushed-on fabric paints in black and gold. Used letter stamps for text with pigment ink I hope proves permanent. (Plan to heat set it with my tee shirt press before I wash it again.)
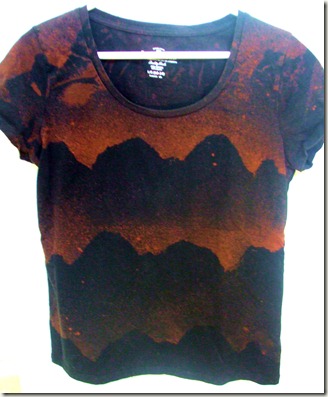
Tried for a mountain range effect on this one: discharge dyed using torn cardboard for resist. This was the fastest & easiest shirt of the day!
This one was straight-up tie dye – haven’t decided if further embellishment is needed. Fan-folded from the lower left corner, then randomly scrunched from the upper right.
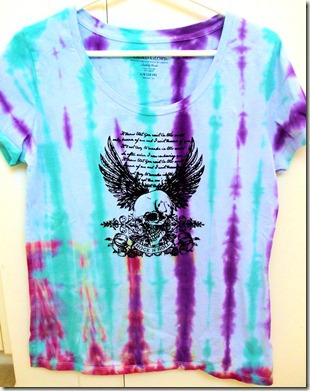
And here’s an embellished tie dye: simple vertical fanfolds, dyed, washed and dried. The teal dye permeated the shirt, so there’s no white left, the background is now pale blue. Then applied a purchased screen stencil. This ink requires heat-setting before washing, which I haven’t done yet.
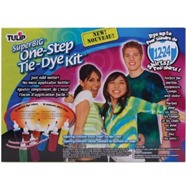
This time we used the Tulip One-Step Super Big Tie Dye Kit.
We picked this particular kit because it does not require pre-soaking the shirts overnight prior to dyeing – we didn’t want to wait for that.
We also liked that it has 12 dye colors. Sure, you can mix primaries to get shades like lime green or coral, but it’s messy and more difficult to share. But I didn’t notice until we’d gotten started that the kit only comes with 8 plastic bottles for dye, darn it. Next time I’ll have extra bottles on hand.
We also had a problem with the teal color in this kit – it ran. We dyed the shirts and let them sit, some for 8 hours and some overnight for 20 hours. When I un-tied the shirts and rinsed them, all had some un-dyed white areas. When these came out of the washing machine, the white areas of the shirts that had teal dye were now light blue. Not the end of the world, but not what we wanted, either.
On our previous outing we used the Jacquard Tie Dye Kit, which does require you to soak materials overnight in a soda ash & water mix, and uses Procion dyes.
You only get 3 colors in this kit, red, blue and yellow, so if you want more shades you have to mix them. However, the finished colors with these dyes are brighter & stronger. I’d probably choose this one again for grown-up project days; but if you’re working with younger kids, or a larger group, I’d go with the Tulip kit.
We used Tulip Fabric Paint Markers, which were a lot of fun and easy to use, but the set we bought had very fine points. Great for outlining or doodle-type designs, not so great for filling in large areas. We found that brushing on fabric paints worked better for that.
The silk-screen type stencil we found at Wal-Mart is called a Zip Screen, and it worked really well. It’s a laser-cut plastic sheet with adhesive backing; you purchase the ink separately in a small plastic bag with a built-in squeegee. Nice!
We purchased some blank tee shirts also at Wal-Mart, where we found 100% cotton Faded Glory shirts for only $4.48 each. We also used some shirts from the back of the closet. It’s nice to have a crummy shirt or two for experimental purposes; you can always wear it to wash the dog.
The biggest hit of the day was the discharge dyeing with bleach. It’s more immediate than tie dyeing: you see results in 10 minutes, and it’s like magic to watch it happen. When you bleach dark-colored shirts, you never know what color will be revealed – the black shirts shown above bleached to a light rust color, but you might get tan, white, or even pink! And it uses ordinary household materials – bonus!
Next time we’d like to experiment with different resist materials for patterning. Maybe try the cheesecloth dry instead of wet … get some onion bag mesh … and try different ties, like those little zip strips, to tie up the shirts as for tie dyeing, but use the bleach solution instead.
And we enjoyed the fabric painting on the dyed fabric. We’d like to get some of that fabric medium you mix with acrylic paints, instead of buying the dedicated fabric paint (small high-priced bottles in few colors).
All in all, big fun!
--MaggieBelize
Designer, kNotes for kNitters
Creator, Happy Hands Hand Cream for Knitters
Sandia Park, NM
As soon as I finished knitting my first Anemone Hat, I simply couldn’t wait to cast on another!
But what a bummer - my conservative little teenage friend loved my hat but picked Oxford Gray yarn for hers. Oxford gray, seriously? “Trust me,” she said.
*sigh*
So here’s her hat in Lion Brand Wool-Ease worsted. This is the “Everyday Anemone” version of the hat, with picot-edged but non-Moebius brim.
She didn’t want the Moebius brim, but she did want the picot edging as shown in the “Arctic” version of Cat Bordhi’s Anemone hat pattern.
Since the picot edging instructions are only given as cast-off for the Moebius brim, I used this tutorial from Heidi Bears to cast on the 5-stitch Twisted Picot edging:
http://heidibearscreative.blogspot.com/2011/02/pretty-pic...
And now that it’s finished, it really does look cute – maybe she was right?
I just love knitting these hats! Thank you, Cat!
--MaggieBelize
Designer, kNotes for kNitters
Creator, Happy Hands Hand Cream for Knitters
Sandia Park, NM
Wow, what fun!
This is a great knitting pattern by Cat Bordhi. Lotsa new techniques, love that links to video demos are included. The pattern includes a lot of options – the brim can be knitted up in Moebius fashion or straight, you can use worsted or bulky yarns, in adult and children’s sizes.
Here are photos of my Anemone Hat “before” and “after” washing & drying, which really made the tendrils stand up.
I used a merino worsted superwash yarn from Sunshine Yarns in the Bitterroot colorway.
I knitted the Moebius brim version in an Adult Large, using a 38” cable. After I finished the brim, I used the Magic Loop technique all the way up.
I really, truly, can’t wait to cast on another! I want to knit one up in Lorna’s Laces … and one in bulky …
--MaggieBelize
Designer, kNotes for kNitters
Creator, Happy Hands Hand Cream for Knitters
Sandia Park, NM
We are hosting a one-day-only, everything-must-go, whole-house yard sale at 14 Digby Lane, Edgewood, New Mexico, this Saturday, February 18, from 10 AM to 4 PM.
And you're invited! Bring friends! ;) The current weather report says Saturday will be the prettiest sunny day of the week, and we believe it, ahahahaha.
This is a "whole house" yard sale, including items for every room. Here's just some of the stuff we've got for sale … click the linked items to see a full description on Craigslist Albuquerque:
· Oval dining room Table & 6 Windsor-back chairs Table $150, Chairs $40 each, or $300 for the whole set!
· 2 Kitchen Bar Stools Ready to paint or stain. $25 each or $40 for both.
· Upholstered Chairs
· Glider Rocker (needs repair) $30
· Full-size Futon couch
· Media Center & Cabinets Low media stand table $75, two cabinets $30 each, or $125 for all three
· Contemporary home office Desk, Chairs & File Credenza $100
· Dishes & Kitchen gear
· Men's & women's Jeans & Clothing
· Kids' stuff (clothes, toys, books, games & DVDs)
· Color TVs (not HD)
· Assorted Hand Tools,
· Universal Gym
· Large wooden Dog House
We hope you can stop by on Saturday to say "hello" ... and please feel free to forward this link to everyone you think might be interested!
--MaggieBelize
Designer, kNotes for kNitters
Creator, Happy Hands Hand Cream for Knitters
Sandia Park, NM
Gosh this was a fun knit! It’s a semicircular shawl – or, as I made the smallest size, a shawlette. Here it is, drying on my blocking board:
This is the Daybreak pattern designed by Stephen West. I like that the designer shows it worn bandana-style, very Western looking. Here’s his pattern photo:
This pattern calls for fingering weight yarn in two colors. I was inspired by this colorway called “Early Autumn”, hand-dyed by Crafty Hippy:
And I paired it with a forest green colorway of Araucania Ranco Multy:
I still have quite a bit left of both yarns … hmm, I’m thinking a matching pair of fingerless mitts … striped, maybe?
--MaggieBelize
Designer, kNotes for kNitters
Creator, Happy Hands Hand Cream for Knitters
Sandia Park, NM
We were frugal before frugal was cool! Tales of crafty living high & dry in the Sandia Mountains of New Mexico ... crafting, knitting, recycling, up-cycling, re-purposing, bargain hunting & outright scavenging. Plus, answers to the eternal challenge, "What's for dinner?"